Angular2 Popup Modal Window


Popup Modals are nowadays come in to play in a handy way which can be seen in most of the modern web applications. These Popup modals are usually come as a form, as confirmation message or can be used for many other activities in the web application. Though creating a Popup  modal is not a very big deal this article will help you to get to know how to create a popup model  in Angular.

Go to your Angular project folder and you should import Popup library to your project.
npm install ng2-opd-popup --save


Now run the project. Now copy the following import code from the npm guide and paste it in app.module.ts
import {PopupModule} from 'ng2-opd-popup';

Also you have to paste PopupModule.forRoot() inside the imports in the same file.


import { BrowserModule } from '@angular/platform-browser';
import { NgModule } from '@angular/core';
import { FormsModule } from '@angular/forms';
import { HttpModule } from '@angular/http';

import { AppComponent } from './app.component';
import { NavbarComponent } from './Components/navbar/navbar.component';import {PopupModule} from 'ng2-opd-popup';

@NgModule({
  declarations: [
    AppComponent,
    NavbarComponent
  ],
  imports: [
    BrowserModule,
    FormsModule,
    HttpModule,
    PopupModule.forRoot()
  ],
  providers: [],
  bootstrap: [AppComponent]
})
export class AppModule { }

Above I have highlighted the codes that I have added to the file.
Now paste the following code in the top of the app.components.html file.
<popup #popup1>
    Add your custom html elements here
</popup>
So now you have to make changes in your app.components.ts file as below.

import { Component, ViewChild } from '@angular/core';import {Popup} from 'ng2-opd-popup';

@Component({
  selector: 'app-root',
  templateUrl: './app.component.html',
  styleUrls: ['./app.component.css']
})
export class AppComponent {
  @ViewChild('popup1') popup1: Popup;
  title = 'app works!';
}
Now you have to create a button to fire the popup.

<button class="btn btn-default navbar-btn" (click)="Clickbutton()">Login</button>

(click)="Clickbutton() shows the click event that we have created.
Now  lets create the event.
Copy the following code and paste it inside the export class AppComponent.
ClickButton(){
    this.popup1.show();
  } 
Now you should add the options as below inside the button function that we created .
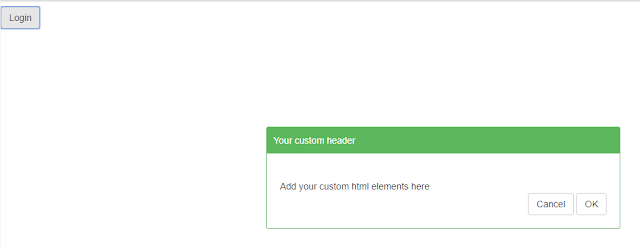
this.popup1.options = {
  header: "Your custom header",
  color: "#5cb85c", // red, blue....
  widthProsentage: 40, // The with of the popou measured by browser width
  animationDuration: 1, // in seconds, 0 = no animation
  showButtons: true, // You can hide this in case you want to use custom buttons
  confirmBtnContent: "OK", // The text on your confirm button
  cancleBtnContent: "Cancel", // the text on your cancel button
  confirmBtnClass: "btn btn-default", // your class for styling the confirm button
  cancleBtnClass: "btn btn-default", // you class for styling the cancel button
  animation: "fadeInDown" // 'fadeInLeft', 'fadeInRight', 'fadeInUp', 'bounceIn','bounceInDown'
};

Now the full function will looks like,
ClickButton() {
  this.popup1.options = {
    header: "Your custom header",
    color: "#5cb85c", // red, blue....
    widthProsentage: 40, // The with of the popou measured by browser width
    animationDuration: 1, // in seconds, 0 = no animation
    showButtons: true, // You can hide this in case you want to use custom buttons
    confirmBtnContent: "OK", // The text on your confirm button
    cancleBtnContent: "Cancel", // the text on your cancel button
    confirmBtnClass: "btn btn-default", // your class for styling the confirm button
    cancleBtnClass: "btn btn-default", // you class for styling the cancel button
    animation: "fadeInDown" // 'fadeInLeft', 'fadeInRight', 'fadeInUp', 'bounceIn','bounceInDown'
  };
  this.popup1.show(this.popup1.options);
}

Now run the project and see.


Now your popup modal will work.Click here to get the source code.
From next article lets see how to create multiple popups in the same page.

Comments

Popular posts from this blog

Java Part 2 :How to Install Java

Working with Buttons in Android Studio

Ruby - Dynamic, Open source programming language